The Terracotta Army is not an easy place to photograph perfectly. The warriors are behind viewing barriers, the halls can be busy, and the strongest views are often shared with many other visitors. Good photos are still possible, but they come from realistic expectations, patient positioning, and knowing what details to look for.
This guide is for travelers using a phone, compact camera, or normal travel camera. It focuses on practical museum photography: where to spend time, what to photograph besides the obvious wide shot, how to handle crowds, and how to stay respectful of posted rules and staff instructions.
Quick photography snapshot
- Best main photo goal: a clear Pit 1 scale view plus a few meaningful detail shots.
- Best mindset: take workable photos and keep looking, instead of fighting every crowd for one perfect angle.
- Most useful preparation: charged phone, enough storage, comfortable shoes, and a route that gives you time to pause.
- Most important rule: follow current museum signs and staff instructions for photography, flash, tripods, restricted areas, and barriers.
Start with realistic expectations
The Terracotta Army is an archaeological site and museum, not a photo studio. You cannot walk among the warriors, move barriers, or control the crowd. Some views are distant, some angles are blocked by railings, and some areas may be darker than your phone expects.
That does not make photography disappointing. It simply means you should plan for a mix of images: one or two wide views, a few warrior details, some context shots, and maybe a photo of your group outside the most crowded areas. The first-time museum guide helps you understand where the main stops fit into the route.
Pit 1: the main scale shot
Pit 1 is usually the most important photography stop because it shows the scale of the Terracotta Army better than any single close-up. Do not rush it. Give yourself a few minutes to find a reasonable position along the railing, look for the depth of the formation, and decide whether a horizontal or vertical frame tells the story better.
The Pit 1 guide explains why this area matters. If the railing is busy, wait briefly, move along the edge, and avoid blocking other visitors for too long. A clean, honest wide shot is better than a stressful attempt to capture every figure at once.
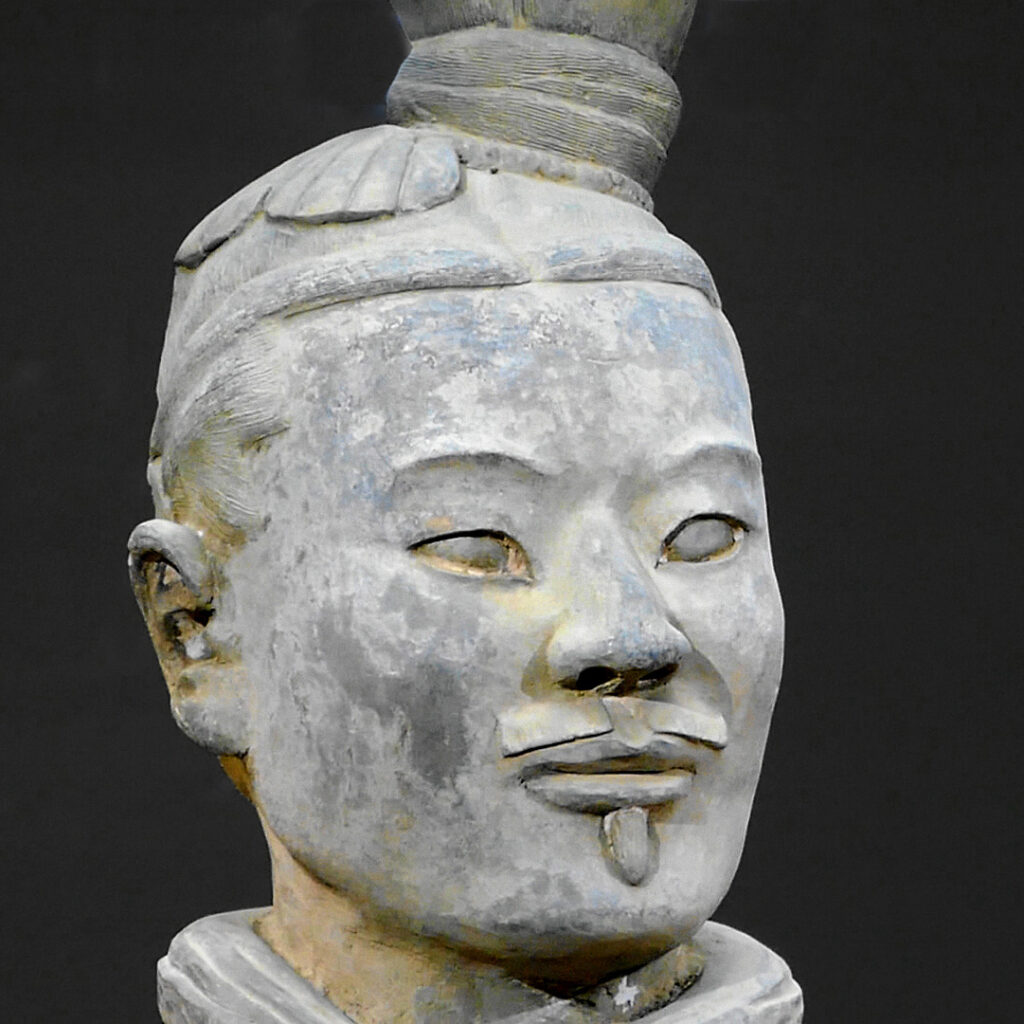
Photograph details, not only the crowd favorite
Many visitors take the same wide view and miss the details that make the warriors interesting. Look for different faces, hairstyles, armor plates, hands, horses, broken pieces, repaired sections, and excavation edges. These details help your photos feel like observations rather than only proof that you were there.
Pit 2 and smaller displays can be useful for this kind of looking. The Pit 2 guide is especially helpful if you want to understand warrior types and excavation context before taking detail photos.

Phone photography tips
A phone is enough for most travelers if you use it carefully. Clean the lens before you enter the main halls. Tap to focus on the subject, reduce exposure if bright areas wash out the scene, and avoid extreme digital zoom when possible. Take a few stable shots instead of one hurried shot while walking.
Use your phone for short context videos sparingly if the area is crowded. Long filming at railings can block other visitors and make you miss the actual museum experience. The best phone photos often come from patience and framing rather than technical settings.
Camera and lens expectations
A normal travel camera can work well, but do not overbuild the day around equipment. A moderate zoom can help with distant details, while a wide angle helps show the scale of Pit 1. Large bags, complicated lens changes, and heavy equipment can become annoying in crowded areas.
If you bring a camera, still plan like a regular visitor. Wear comfortable shoes, keep the bag manageable, and use the what to wear guide if you are unsure what to carry. Better comfort usually leads to better photos.
Flash, tripods, and restricted areas
Photography rules can depend on the area, display, crowd control needs, and current museum instructions. Follow posted signs and staff directions for flash, tripods, selfie sticks, barriers, restricted areas, and special exhibits. If a staff member tells visitors not to shoot in a certain way, treat that as the rule for that moment.
A practical approach is simple: do not use flash unless it is clearly allowed and appropriate, do not block pathways with equipment, and do not place cameras or phones over barriers. The goal is to photograph the museum respectfully without interfering with preservation, safety, or other visitors.
How to handle crowds while taking photos
Crowds are part of Terracotta Army photography. Instead of fighting for the densest spot, move along the railing, wait for small openings, and take a photo when the view is good enough. Sometimes a slightly off-center angle is more useful than the most popular position.
The crowd avoidance guide gives broader timing and route advice. For photos, the key is to keep moving. Take the shot, enjoy the view, and let others have space.
How much time should photographers allow?
If photography matters to you, do not plan the shortest possible visit. You need time to wait for a view, adjust framing, revisit one or two angles, and still understand what you are seeing. A rushed route usually produces rushed photos.
Use how long to spend at the Terracotta Army to decide your overall time. If you only have a half day, the half-day itinerary can still work, but make Pit 1 and one detail area your realistic photo priorities.
Family and group photos
Family and group photos are easier if you do not insist on taking them at the most crowded railing. Look for less congested spaces where the museum context is still clear. With children, keep photo sessions short so the visit does not become a series of forced poses.
If you are visiting with children, the Terracotta Army with kids guide can help keep the route engaging. For older travelers, the senior travelers guide is useful because standing too long for photos can become tiring.
Weather and season effects
The main pit halls are covered, so weather does not control every photo. But the transfer, outdoor movement, clothing, and crowd behavior still matter. In summer, heat can make visitors impatient; the summer visit guide helps with pacing. In winter, shorter daylight and colder transfers matter; use the winter guide if you visit in cold months.
Rain can make outdoor movement and shoes more difficult even when indoor viewing still works. If the forecast is wet, combine these photo tips with the rainy-day guide and keep your phone or camera protected during transfers.
What to photograph besides warriors
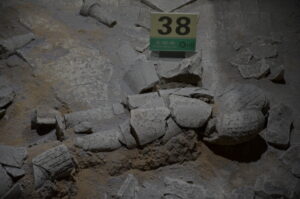
Do not ignore context. Photograph excavation edges, pit depth, roof structure, information displays where appropriate, horses, repaired fragments, and the way visitors view the site. If you visit the bronze chariots, the bronze chariots guide can help you notice why those exhibits deserve attention.
Context photos make your set more useful later. A full album of similar warrior rows can feel repetitive, but a mix of scale, detail, and museum context tells a clearer travel story.
Photography checklist
- Charge your phone or camera before leaving Xi'an.
- Clear enough storage for photos and short videos.
- Clean your lens before entering the main halls.
- Keep tickets and documents easy to reach so entry does not delay the route.
- Start with Pit 1 for scale, then look for details.
- Follow all posted signs and staff instructions.
- Do not block railings, walkways, or other visitors for long shots.
- Take a few context photos, not only close-ups.
Official checks
Use official sources for final entry and museum information: Terracotta Army ticketing information and the Emperor Qinshihuang's Mausoleum Site Museum. Ticketing arrangements, access controls, exhibit rules, and visitor instructions can change, so check close to the day you visit and follow signs on site.
Best photography plan for most visitors
For most visitors, the best plan is simple: see Pit 1 properly, take a few wide views, then slow down for details that show faces, armor, horses, broken pieces, and the scale of excavation. Keep equipment light, stay patient at railings, and respect the museum environment.
The best Terracotta Army photos are not always the technically perfect ones. They are the images that help you remember what the site felt like: the scale, the crowd, the rows of figures, and the small human details in the clay faces.

What to Notice at the Terracotta Army: Faces, Ranks, and Hidden Details
A practical guide to the Terracotta Army details first-time visitors should notice, including faces, hairstyles, armor, ranks, poses,…

Terracotta Army Museum Route Order: Which Pits to See First
Plan a practical Terracotta Army museum route order, including Pit 1, Pit 2, Pit 3, bronze chariots, crowds,…
Terracotta Army Restoration: How Broken Fragments Become Museum Figures
Learn how Terracotta Army fragments are documented, matched, stabilised, and reassembled, why incomplete figures still matter, and what…