Two archers can tell you more about the variety of the Terracotta Army than another photograph of a long row of warriors. One stands with his body turned and his arms separated; the other kneels, with armor clearly modeled across his chest. For a first visit, learning to compare these two figures is a manageable way to look beyond faces and numbers.
This guide is about recognizing standing and kneeling archers associated with Pit 2, not identifying every military rank. Use it while looking at labeled exhibits, or before your trip from Xi’an. Allow a few extra minutes for the comparison if the relevant figures are on display and the viewing space is clear. Exhibition layouts change, so the older photographs below illustrate details rather than promise an exact current case location.
A quick comparison to take into the museum
- Start below the waist: standing and kneeling postures are easier to distinguish than small details of hairstyle.
- Look at the torso: compare the standing figure’s robe with the modeled armor on the kneeling figure shown here.
- Follow the arms: notice where each hand is positioned, even when no weapon is present.
- Read the label: a standing warrior is not automatically an archer, and an empty hand alone does not identify a weapon.
- Connect the figure to its findspot: a museum case shows an individual; the pit plan gives the wider context.
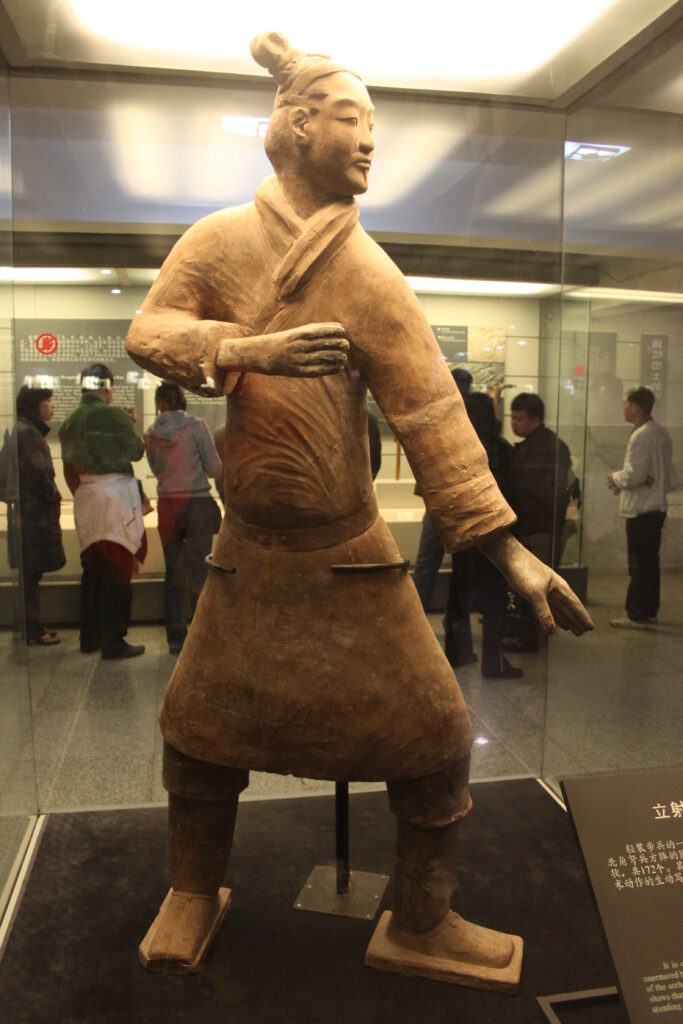
How to recognize the standing archer
In the first photograph, the figure is not standing squarely at attention. The feet point in different directions, the upper body turns, and the two arms occupy different positions. Follow that movement from the feet through the waist to the head. Seen this way, the pose becomes much easier to read than it does in a tightly cropped photograph of the face.
The robe is another useful clue in this particular example. Broad folds cross the torso and gather around the belt, while the sleeves have a softer, less regularly patterned surface than the armor in the next photograph. The distinction is visible without counting plates or knowing specialist terminology. Look first for folds versus repeated rows; then read the object’s identification.
Do not extend that shortcut to every upright figure in the museum. Officers, infantry figures, and other types also stand. Nor does a turned body by itself prove that a figure is an archer. The label and archaeological interpretation supply the identification; the pose helps you understand why that identification makes visual sense.
How the kneeling archer differs
The museum’s kneeling-archer catalogue entry describes a figure from the crossbow formation in the eastern part of Pit 2. It records a bent left leg, a grounded right knee, armor over a robe, and hands held to the body’s right in a weapon-holding posture. Its listed height is 128 cm, a measurement for that catalogued object, not every kneeling archer.
In our second photograph, start with the grounded knee and raised leg, then move up to the chest. The repeated armor shapes are easy to distinguish from the drapery below them. This is a useful comparison for children too: ask them to find one area that looks like fabric and another that looks like protective equipment, without touching the case.
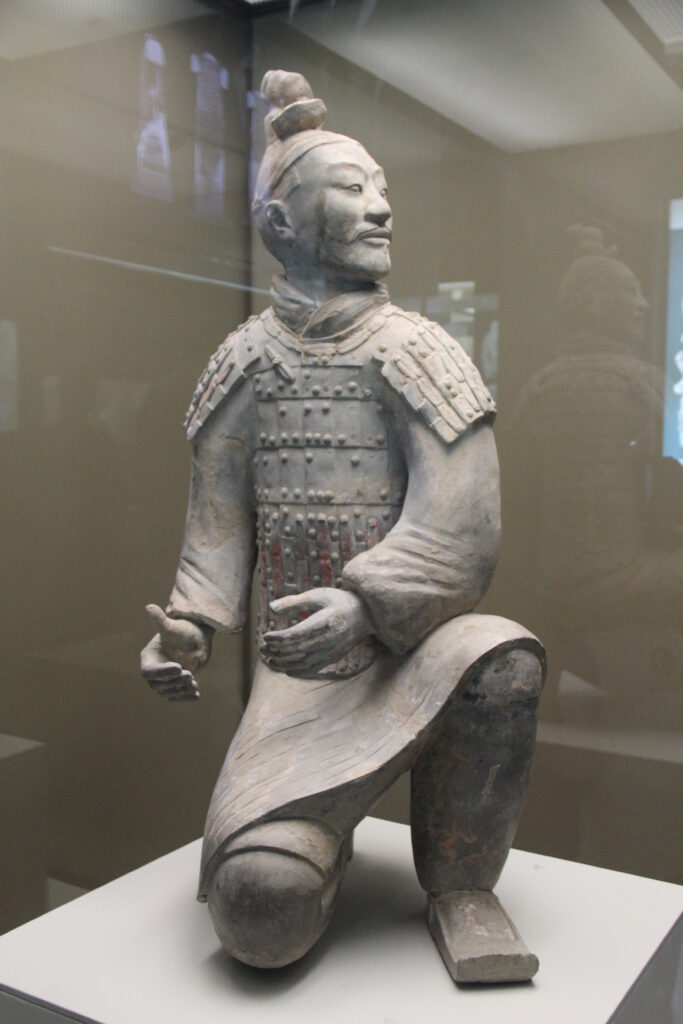
Why empty hands still matter
An absent weapon can make a pose seem puzzling. Instead of trying to imagine a precise firing sequence, look at the space between the hands and the way the elbows sit relative to the torso. The figure is representing an action, even when the object involved is not displayed with it.
That observation has limits. A photograph of an empty hand cannot tell you what happened to a particular weapon, whether it was recovered separately, or whether a nearby display contains equipment from that exact figure. Avoid pairing an arrowhead with a statue simply because they appear in adjacent cases. Read the findspot information and object labels before making that connection.
For the surviving metal equipment rather than the poses, our guide to Terracotta Army weapons is the more useful next step. Keeping figures and weapons as related but separate evidence makes both easier to understand.
What Pit 2 adds to the comparison
The museum’s official visitor information describes a crossbow unit in the northeastern part of Pit 2 containing both standing and kneeling figures. It also describes other units involving cavalry, chariots, and infantry. The two archer postures therefore belong in a larger arrangement, rather than being unrelated sculptural experiments.
A pit plan and an individual exhibit answer different questions. The plan helps you understand where types of figures were arranged. A case lets you see how one body, sleeve, hand, or piece of armor was represented. Neither view replaces the other. If the excavation looks less immediately dramatic than Pit 1, the individual figures can give you a reason to pause rather than move straight on.
Use the Pit 2 visitor guide for the wider stop. Here, keep the task small: find the archer area on an available plan, then compare it with the identification on a displayed figure. Do not expect the visible excavation to reproduce a fully restored formation.
Look behind the figure when access allows
The third photograph changes the viewing angle. From behind, the kneeling figure reveals modeled ties, rows across the armor, and the exposed sole of the rear shoe. These details are largely absent from the frontal image. That is the point of taking a second viewpoint: not another almost identical face photograph, but information that the first view cannot provide.
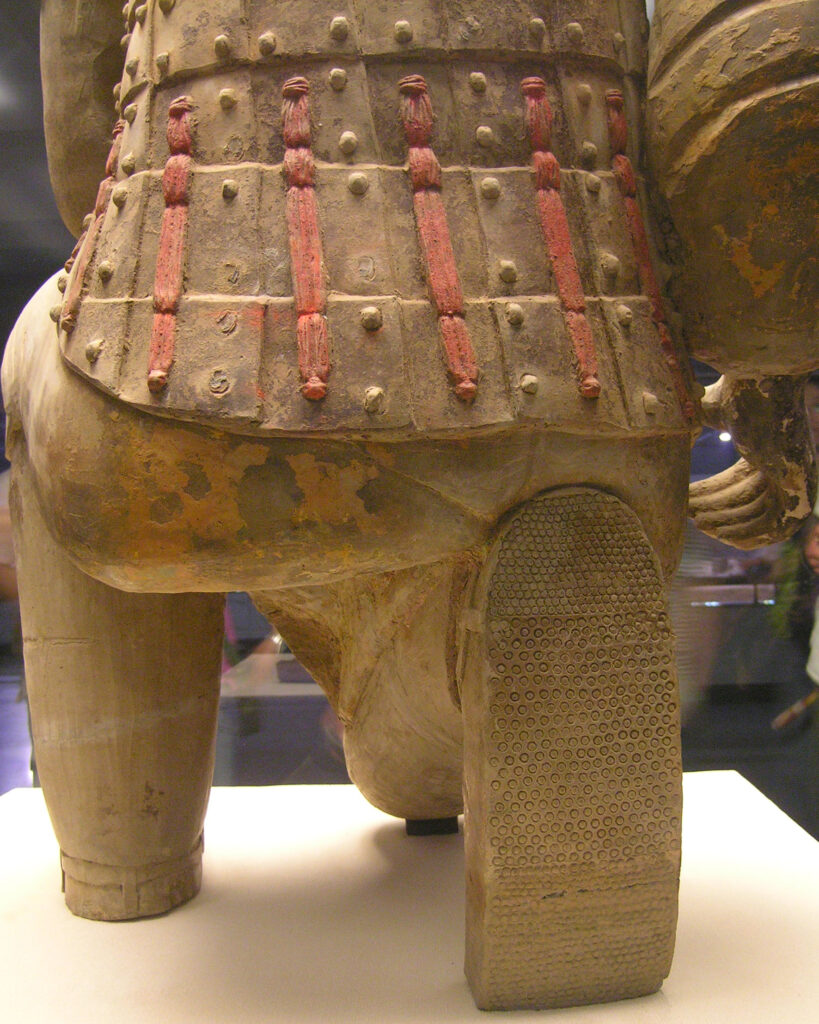
If a case allows visitors to move around it, choose a clear side position and wait for space. If it is against a wall or the route is restricted, accept the available view. Never lean across barriers to reproduce a photograph. A historical image can fill in a detail without becoming a checklist that you must recreate.
Notice the red areas in this rear-view photograph, but do not use the image to reconstruct the entire original color scheme. Lighting, surviving material, and the condition of individual objects all affect appearance. The guide to the warriors’ lost colors explains that separate subject in more depth.
A simple viewing sequence for your visit
- Take in the whole figure. Leave enough distance to see the feet, knees, torso, and arms together.
- Check its name. Confirm whether the label identifies a standing archer, kneeling archer, or another type.
- Choose one comparison. Robe folds versus armor rows is a good starting point; there is no need to inspect every feature.
- Look from a second angle if permitted. See whether a rear or side view changes your understanding.
- Return to the wider route. The comparison should enrich your museum visit, not turn it into a hunt for one specific photograph.
At a busy case, finish looking before raising your phone. One full-length image usually explains posture better than several cropped portraits. For reflections, try a small change of position within the permitted viewing area, and follow the posted photography rules. Our museum photography tips cover that practical side.
Before leaving Xi’an
Keep your booking and journey planning separate from this object comparison. Check the museum’s current notices, then leave time for the main pits and any exhibits accessible on your visit. There is no need to book an extra attraction simply to use this guide. The museum route guide helps place the stop within your day.
The takeaway is not a rule that every figure can be classified at a glance. It is a better way of looking: posture first, clothing next, hands after that, and the label throughout. Once you have compared a standing archer with a kneeling one, the army becomes less like a repeated pattern and more like an arrangement of different roles.
Qin Stone Armor and Helmets: What to Notice from Pit K9801
Stone plates, drilled holes, and a helmet assembled for burial: a close-looking guide to Qin stone armor and…
Qin Civil Officials at the Terracotta Army: What Pit K0006 Reveals
Discover the Qin mausoleum civil officials of Pit K0006: why their folded sleeves, charioteers, colours, and separate setting…
Bronze Water Birds at the Qin Mausoleum: Cranes, Swans, and Geese
A visitor guide to the bronze water birds from the Qin mausoleum: why cranes, swans, and geese matter,…