Faces receive most of the attention in photographs of the Terracotta Army, but the top and back of a figure’s head can be just as informative. Hair was modeled strand by strand, knots were placed in different positions, and some military figures wear distinctive caps or crowns. Learning to separate hair from headgear gives first-time visitors a practical way to compare figures without pretending that every hairstyle has one simple meaning.
This guide is for visitors who want a focused observation exercise in the museum. It uses an archer, a mid-ranking officer, and a high-ranking officer to show what to notice. These photographs document individual museum displays at different times; they do not guarantee that the same objects will be in the same cases during your visit.
A quick guide before you look
- Find the hairline first. This helps separate modeled hair from a cap, crown, ribbon, or fastening.
- Change your angle. A side or rear view often reveals a knot that is almost invisible from the front.
- Read the whole figure. Headgear makes more sense beside armor, robe, hands, weapon position, and the museum label.
- Avoid instant rank claims. One visible feature is a clue, not a complete identification system.
- Check the display label. Use the object’s official identification before comparing it with another figure.
Why head details are worth your time
The army can appear repetitive from the main viewing platforms, especially when hundreds of figures are seen at once. A close display changes the scale of the experience. You can follow incised lines across the hair, see where a modeled band crosses the head, and notice how a cap sits above the forehead. These observations turn a general impression of “different faces” into specific, verifiable differences.
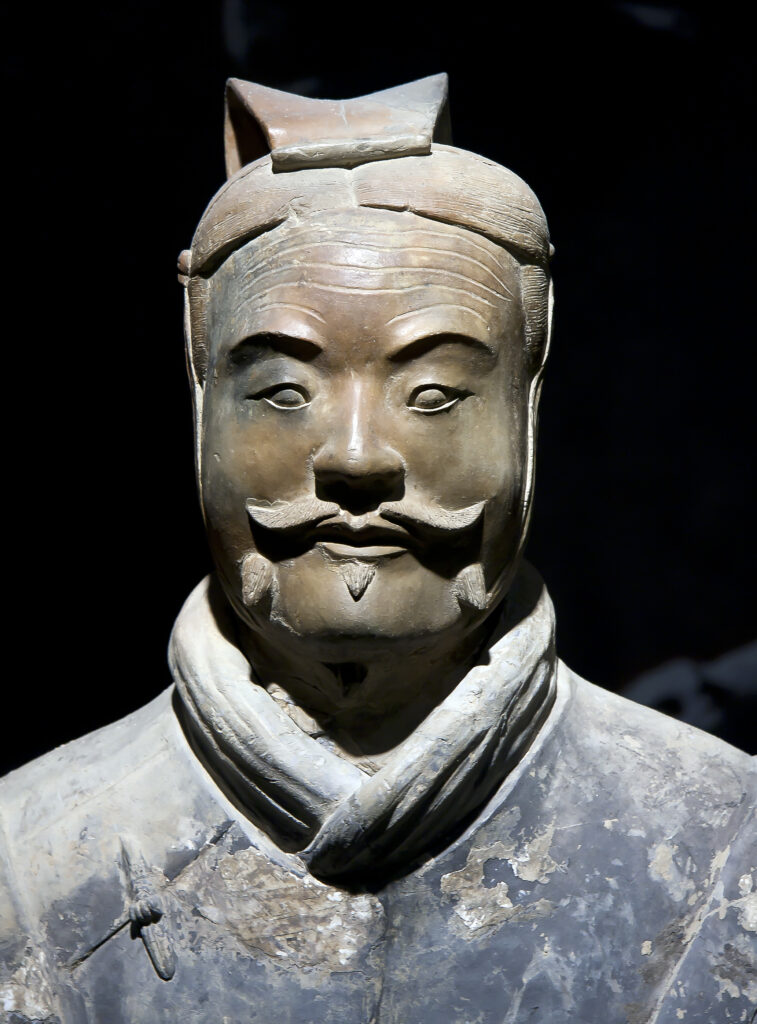
Head details also connect to other parts of the figure. The officer in the first photograph has a clearly defined cap, carefully modeled facial hair, layered clothing, and armor. Looking at only the cap would miss most of the evidence. Looking at the entire figure helps you understand why museum descriptions discuss equipment and dress together with military position.
The museum’s catalogue entry for a mid-ranking officer describes a two-panel long cap and notes that examples could appear beside higher officers or lead groups of soldiers. Treat that as information about the identified officer type, not permission to label every figure with a similar silhouette from a distant photograph.
Step one: separate hair from headgear
Start where the forehead meets the hair. Hair is usually indicated by repeated incised strands or textured masses. A cap or crown has clearer structural edges and may sit over or interrupt those strands. Ribbons and ties can create another layer, so do not assume every raised strip is hair.
In the officer portrait above, the cap has a crisp geometric shape. The hair beside it is represented differently, and the moustache and beard have their own incised texture. Move your attention slowly from the cap to the temples, eyebrows, moustache, and chin. The changes in line direction help distinguish one modeled material from another.
Reflections can flatten these differences in photographs. During a visit, shift a small distance within the permitted viewing area instead of pressing close to the glass. A slight change in angle may reveal an edge or tie that direct lighting hides. For more practical camera advice, use our Terracotta Army photography guide.
Step two: look for the position and construction of a knot
The kneeling archer photograph shows how the modeled hair rises into a tall knot above the head, with a band crossing its base. It is visibly different from a smooth helmet-like shell. The full-length view also keeps the head detail connected to the figure’s armor, hands, and bent-knee posture.
The museum’s kneeling-archer entry describes a knot on the right side of the head. It also describes the figure’s kneeling posture, robe, armor, and weapon-holding position. That combination is important: the hairstyle is one recorded feature within a larger identification.
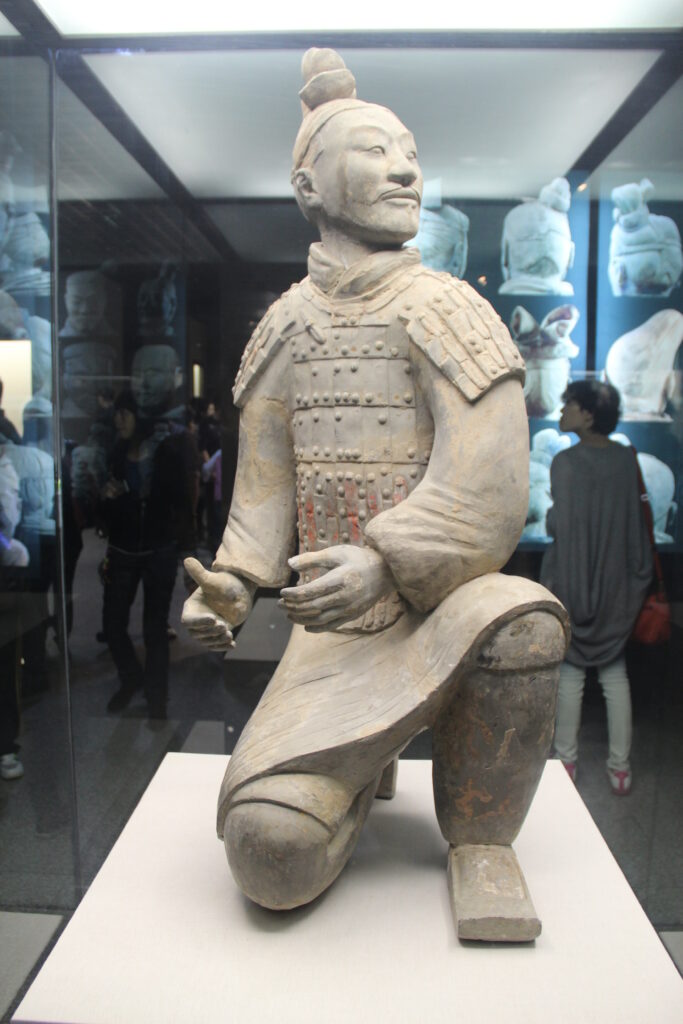
Do not use the knot alone to decide that an unlabeled standing figure is an archer. Different viewpoints can hide its position, reconstruction can affect what is visible, and other military figures also have arranged hair. Begin with what you can actually see, then confirm the object type from the label.
This is a good place to compare with the standing and kneeling archers guide. That article begins with posture and clothing; this one begins with the head. Using both approaches shows why a reliable reading normally depends on several features agreeing with each other.
Step three: compare caps and crowns without oversimplifying rank
Official museum descriptions distinguish several officer types by more than a generic word such as “hat.” The lower-ranking officer entry records a single-panel long cap. The mid-ranking officer entry records a two-panel long cap. The museum’s high-ranking officer entry describes a heguan, together with double robes, decorated armor, crossed hands, and a long sword.
Those descriptions make comparison possible, but they should not be reduced to a souvenir-chart formula. A photograph may not show both panels clearly. A damaged edge can change a silhouette. A display may be seen from an angle that hides the back. Most importantly, the museum’s identification rests on archaeological context and the complete object, not on one visitor’s distant view of the head.
Use a three-part check: first the headgear, then the body clothing and armor, then the hand or weapon position. If all three fit the label, you have a much stronger understanding than you would get from the crown alone.
What the high-ranking officer adds
The third photograph is useful because it includes the full body. Begin at the head, but do not stop there. Follow the ornament down to the neck, the shoulder fittings, the patterned armor, the layered robe, and the hands crossed at the waist. The figure’s visual authority is created by the whole arrangement.
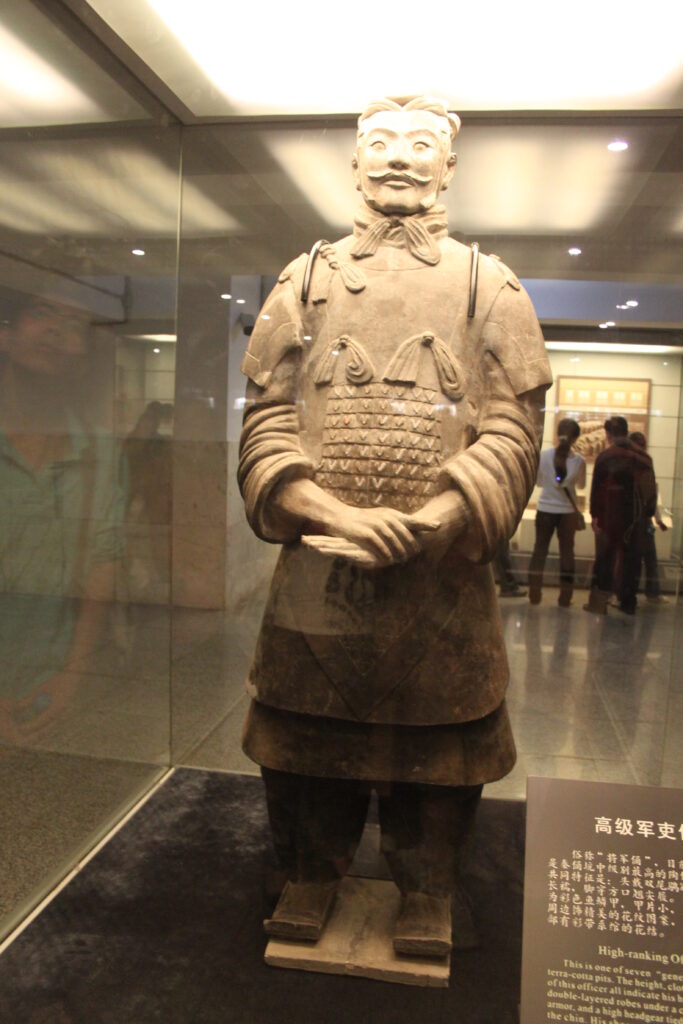
The headgear is prominent, yet the armor and pose make the comparison convincing. This is why the best museum photographs alternate between close details and full figures. A close-up explains construction; a full-length view restores context.
Visitors sometimes describe any elaborate warrior as a “general.” It is better to use the wording on the label. English translations can vary between “high-ranking officer,” “general,” and related terms, while the underlying display may identify a specific category. Record the label if the distinction matters to you, rather than relying on memory after the visit.
Where a cavalryman’s headgear fits
The museum’s cavalryman entry describes hair arranged in a flat knot at the back and a leather cap, along with a knee-length robe, waist-length armor, trousers, boots, and hands positioned to hold equipment and lead a horse. Again, the head is only one part of a role-specific ensemble.
If you see a cavalryman and horse together, begin with their relationship before zooming in on the cap. The shorter armor, clothing and hand position help explain the figure’s function. Our guide to horses, chariots, and cavalry gives that wider context.
Hair, facial hair, and individuality
Modeled moustaches, beards, brows, and hairlines make figures feel individual, but a distinctive face does not prove that the sculpture is a portrait of a named soldier. The safest observation is physical: the sculptor varied forms and textures. A claim about a particular historical person would require separate evidence.
Look for the direction of incised lines. Hair on the scalp, moustache, and beard may use different strokes. Also notice damaged or faded surfaces. The figures were not originally intended to appear as uniform grey statues; surviving pigments and surface treatment affect how details read today. The guide to the warriors’ lost colors explains that change.
A five-minute observation exercise
- Choose one labeled figure. Avoid beginning with a distant figure whose type you cannot confirm.
- Trace the hairline. Identify textured hair, then look for a separate cap, crown, band, or tie.
- Move to a second angle. If the case and visitor flow allow it, check the side or back for a knot.
- Read downward. Compare collar, robe, armor, hands, and any weapon or associated horse.
- Make one careful comparison. Choose another labeled figure and name two visible differences without trying to build a complete rank chart.
Five focused minutes are enough. On crowded days, do the exercise at whichever case offers a clear view instead of blocking circulation around a famous figure. If you are planning the order of your halls and pits, the museum route guide will help you place detailed observation after the main overview.
Before your visit
Check the museum’s current visitor information and exhibition notices before traveling. Objects can be moved for conservation, research, or temporary exhibitions, so use these photographs as a way to learn what to look for rather than a promise of a fixed display. Leave enough time for the main pits and do not rush through Pit 2 or the exhibition areas solely to locate one photographed head.
The most useful lesson is simple: look at edges, textures, and combinations. Hair strands, knots, caps, crowns, armor, and posture work together. Once you start reading those relationships, the Terracotta Army becomes a collection of carefully differentiated figures rather than a wall of nearly identical faces.
Standing vs Kneeling Archers at the Terracotta Army
Compare the archers of Pit 2 through their posture, robe folds, armor, and hand positions, with a simple…
Qin Stone Armor and Helmets: What to Notice from Pit K9801
Stone plates, drilled holes, and a helmet assembled for burial: a close-looking guide to Qin stone armor and…
Qin Civil Officials at the Terracotta Army: What Pit K0006 Reveals
Discover the Qin mausoleum civil officials of Pit K0006: why their folded sleeves, charioteers, colours, and separate setting…